For the record I am making every attempt to make this a bi-lingual blog and purely out of respect for the audience and the English language itself. Knowing this will be viewed by both American and U.K. audiences and beyond, I am trying to use the proper nomenclature for each side of the pond. This is why you will see things such as boot/trunk, gas/petrol, hood/roof etc, throughout the blog.
I cant do much about the "Football/Soccer" situation but I will contribute in other ways as best I can. Much respect and I am having the time of my life with this endeavor (endeavour).
Saturday, November 30, 2013
Dismantling Session #14 - 11-16-13 - Morning Surprise
So after puling the gas/petrol tank I did a couple of rounds of Marine Clean and a chain in the bottom of the tank with some vigorous shaking yesterday. I needed to do a couple more rounds of cleaning inside and its a bit of a challenge to get all of the water out of the tank so I left a little in the tank over night to soak. I woke up this morning to find a soapy-rusty liquid on the floor of the garage. It didn't take long to discover the four pin holes in the picture below.
Sort of lucky set of circumstances because I might not have otherwise noticed them if I was shaking and dumping. These holes were probably a bit too big for the tank sealer to have worked effectively. As you can see I decided to skip ahead a couple steps and sand the entire thing down sooner than later, especially since the weather was decent and I can work out side. I managed to discover some additional pitting in a few spots that I covered up as well for good measure. As you can see below I used Permatex, a combination of a fiberglass and epoxy sealant, to cover up the holes and the pitted spots. This stuff dries pretty quickly so you don't get much of a chance to smooth it out to make it look pretty but it will get a coat of POR15 and be hiding well under the vehicle out of view.


Sort of lucky set of circumstances because I might not have otherwise noticed them if I was shaking and dumping. These holes were probably a bit too big for the tank sealer to have worked effectively. As you can see I decided to skip ahead a couple steps and sand the entire thing down sooner than later, especially since the weather was decent and I can work out side. I managed to discover some additional pitting in a few spots that I covered up as well for good measure. As you can see below I used Permatex, a combination of a fiberglass and epoxy sealant, to cover up the holes and the pitted spots. This stuff dries pretty quickly so you don't get much of a chance to smooth it out to make it look pretty but it will get a coat of POR15 and be hiding well under the vehicle out of view.
Dismantling Session #13 - 11-15-13 - Gas/Petrol Tank Cleaning Day
So with the leg in a bit better shape and no more crutches I am able, and actually encouraged, to do more standing and walking to get my leg muscles back. What better way to exercise than to stand, walk, lift, spray, scrub, shake and clean a gas/petrol tank?
Here she is prior to removing the fuel sending unit...


Close up of the filter. I'm guessing this car didn't run really smooth the last time it was driven.
Here she is prior to removing the fuel sending unit...
Fuel sending unit out. Good shape except for that filter...
Close up of the filter. I'm guessing this car didn't run really smooth the last time it was driven.


Dismantling Session #12 - 10-30-13 - Post Surgery Impatience
So per the docs orders I wasn't allowed to drive or even walk much until two weeks after surgery. So I just barely made it that long before I went completely nutso sitting on the couch. I did manage to catch up on a lot of Top Gear and Wheeler Dealers episodes including the two parter where they fix up an old Spitfire. Got a few tips when I have to tackle the intake manifold on the TR7.
So I hobbled out to the garage with my full leg brace on and my crutches and leaned up against the TR7 and managed a little light duty disassembly. I removed the wipers the wiper motor and the wind screen bottom plate. The compression sleeve on the left wiper was a little too compressed and being made of a pretty soft metal was a bit of a challenge to remove but everything else came out pretty easy and was in good shape. All tagged, bagged and boxed for later.


So I hobbled out to the garage with my full leg brace on and my crutches and leaned up against the TR7 and managed a little light duty disassembly. I removed the wipers the wiper motor and the wind screen bottom plate. The compression sleeve on the left wiper was a little too compressed and being made of a pretty soft metal was a bit of a challenge to remove but everything else came out pretty easy and was in good shape. All tagged, bagged and boxed for later.
Dismantling Session #11 - 10-13-13 - Pre Surgery Push
So my goal was to get the axle dropped and the gas (petrol) tank out before I went into surgery to replace my torn ACL in my knee from playing baseball. I'm still not to old for it damn it. I did manage to get it done but only by a day. Knowing I wouldn't be able to do much of anything, let alone work on the car, for weeks on end I had to get this done. Here is a break down of that day...
As you can see I failed to get the lower trailing arms off the chassis. They were on there pretty good and I also had a wrist issue (another baseball injury) that wasn't allowing me much in the way of leverage. My impact driver sheared off a 3/8" socket adapter in the process so in the interest of the gas/petrol tank I carried on with them hanging.

So there it is tucked neatly between the rear of the seats and the trunk/boot. Only four nuts to loosen on the straps and a good tug and it was out.

Pretty good shape after all these years.

The resulting empty cavity was in even better shape. It will still get a scuffing and a cleaning before it gets coated with POR15. I figure she should last at least another 33 years.

Finally a peek into the trunk/boot access panel to the gas/petrol filler opening. The hole on the left is the top access for the shock absorber. Again a little surface rust but all in all in good shape.

As you can see I failed to get the lower trailing arms off the chassis. They were on there pretty good and I also had a wrist issue (another baseball injury) that wasn't allowing me much in the way of leverage. My impact driver sheared off a 3/8" socket adapter in the process so in the interest of the gas/petrol tank I carried on with them hanging.
So there it is tucked neatly between the rear of the seats and the trunk/boot. Only four nuts to loosen on the straps and a good tug and it was out.
Pretty good shape after all these years.
The resulting empty cavity was in even better shape. It will still get a scuffing and a cleaning before it gets coated with POR15. I figure she should last at least another 33 years.
Finally a peek into the trunk/boot access panel to the gas/petrol filler opening. The hole on the left is the top access for the shock absorber. Again a little surface rust but all in all in good shape.
Wednesday, November 27, 2013
Dismantling Session #10 - 10-5-13
Dropping the rear springs and arms today...
Left Rear Before


Right Rear Before


Left Rear After (Forgot to take a pic of the Right Rear After - You get the point)


Dismantling Session #9 - 9-27-13 - Big Decisions...
Got her rear end up in the air now. One reason is I need to get the car in this position (frankly a bit higher than this) to remove the engine. The engine removal angle on these cars is odd in order that you can avoid crushing the nose on the front. Nonetheless after some local research and discussion and discovering that my floor boards and hidden metal was essentially free of rust, I have decided to forego a complete strip down and repaint and instead redo the underside and suspension. I will still be removing the engine obviously. I will then be cleaning and stripping the under carriage and painting the underside with POR-15 in a black semi-gloss. I will also remove the interior except for the dash, and POR-15 the entire floor board and interior well and install Hush Mat.
Once that is complete I will reinstall the suspension after grinding and repainting the axle, subframe, rear trailing and radius arms and prop shaft in the same semi gloss black. I will be reinstalling new shocks, struts, springs, uprated stiffer front and rear anti roll bars, poly bushings throughout, and steel braided flexible brake lines. At that point I will have a rolling frame in damn good shape to deliver to the paint shop. A lot to do before then and below is the start of that process...


I needed to remove the interior carpeted panels behind the seats to access the top of the shocks. This is the before/during...

This is the after to expose the top of the rear shocks...

Close up of the right rear shock top... Little bit of rust through on the opening where that third screw clip goes (about 11 o clock in the pic) I will sand it down and see what it looks like but easy fix with a new clip or a quick little weld of a washer or metal strip if things turn out worse that they look.

Left side with the shock already removed. Much of what looks like surface rust here is the glue for the carpet panels and sound deadening foam.

Once that is complete I will reinstall the suspension after grinding and repainting the axle, subframe, rear trailing and radius arms and prop shaft in the same semi gloss black. I will be reinstalling new shocks, struts, springs, uprated stiffer front and rear anti roll bars, poly bushings throughout, and steel braided flexible brake lines. At that point I will have a rolling frame in damn good shape to deliver to the paint shop. A lot to do before then and below is the start of that process...
I needed to remove the interior carpeted panels behind the seats to access the top of the shocks. This is the before/during...
This is the after to expose the top of the rear shocks...
Close up of the right rear shock top... Little bit of rust through on the opening where that third screw clip goes (about 11 o clock in the pic) I will sand it down and see what it looks like but easy fix with a new clip or a quick little weld of a washer or metal strip if things turn out worse that they look.
Left side with the shock already removed. Much of what looks like surface rust here is the glue for the carpet panels and sound deadening foam.
Dismantling Session #8 - 9-22-13
Tackling the fan/pulley and radiator removal along with the upper and lower charcoal canisters from the US spec Air pollution kit. The fan/pulley is the round silvery thing on the front of the engine. The canisters are the round black items with the little red tip on top. Those will not be going back in the car. Good thing as for two seeming easy little items they were a bit of a pain to remove due to the placement of the holding clamps. Nonetheless this gets me the front end clearance to pull the engine. Still have a lot to disconnect before I do that but big step out of the way.
Before fan/pulley and canister removal...

After fan/pulley and canister removal...

After the radiator removal. Note that the thing that looks like a radiator is the AC cooling tower. That will be coming out as well.

Before fan/pulley and canister removal...
After fan/pulley and canister removal...
After the radiator removal. Note that the thing that looks like a radiator is the AC cooling tower. That will be coming out as well.
Dismantling Session #7 - 9-12-13
After a bit of work reorganizing and purging the garage shelves of "stuff" I made some room for some of the larger and more delicate bits on the shelves. That completed I started stripping out the door interiors. I stopped short of removing the glass and since I figured it is safer inside the door for a while versus sitting on a shelf. The door steel is in GREAT shape and should prime and paint up nicely. The door cards themselves are in good shape but the backing board is warped from some past water damage. The previous owner had apparently tried to caulk the bottom of the door cards to the door steel, which in hindsight probably worsened the problem since it didn't allow water and condensation to exit. Since the backer board is Masonite (particle board) I am going to try to steam it back into shape and lay it flat with some pressure on it. That wont happen for a while but I have managed to steam bend wood and particle board in the past and I figure it is worth a shot before spending the money on new cards. I will have to get a new set of fasteners all the way around either way as the plastic ones were pretty brittle. I have bigger fish to fry before I tackle this job but I guarantee wobbly, warped door panels will drive me nuts in the future so a solution has to be found.
Passenger (Right Side for us Yankees) before and after...


Passenger (Right Side for us Yankees) before and after...
Drivers Side (Left for us Yankees) before and after...
Wednesday, October 16, 2013
Dismantling Session #6 - 9-8-13
A little before and after on the pop up head light removal. Not nearly as bad a project as I expected. I left them in tack upon removal and will strip them down and clean up the motor. Everything seems to be in working order. Word has it the biggest issue of failure on these things is a) getting and keeping them properly aligned and b) making sure the electrical connections are kept clean. We shall see.


Dismantling Session #5 - 9-5-13
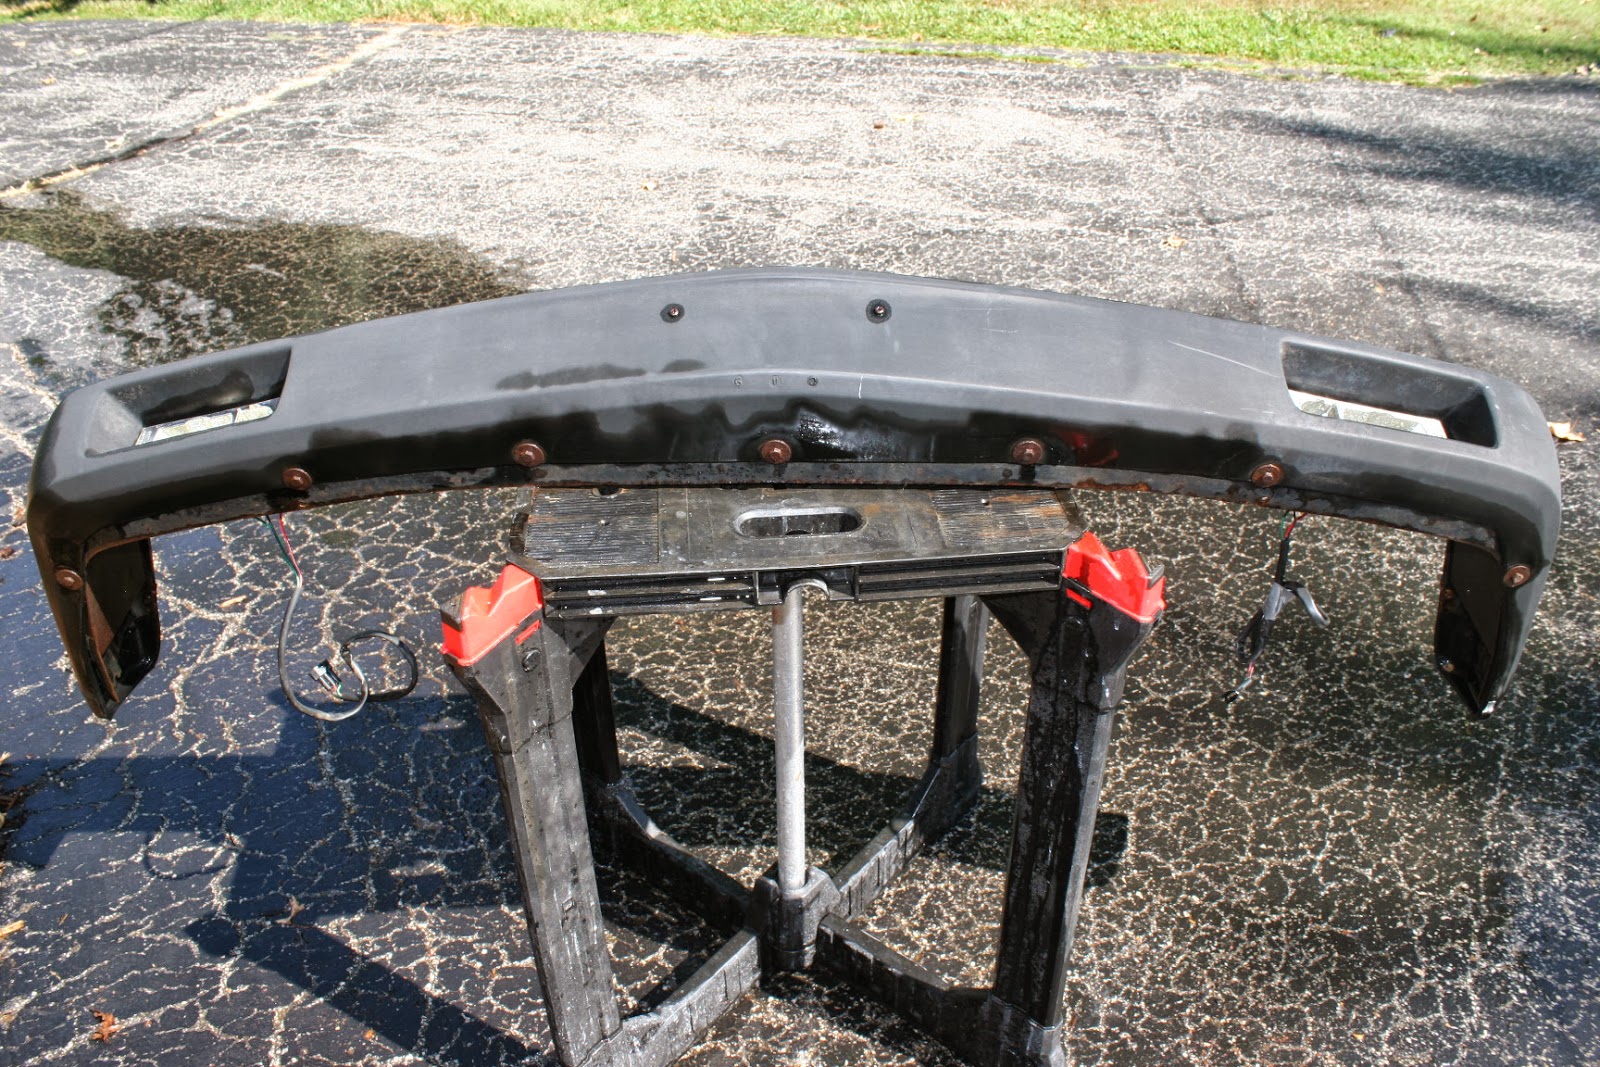
Pulling off the bumpers today. Its a good 90 degrees plus today so I don't know why I am out here. I guess love makes you do funny things. Anyway, for giggles I threw a little Armor All on the middle of the bumper just to be able to squint into the future a bit. Still needs some more elbow grease. Back bumper came off really easy except it is a heavy SOB. Got it on a stand and hit it with some degreaser before I put it away for a while. Frame and spare wheel well are in excellent shape for a 33 year old girl.


Front bumper was a bit more of a challenge but really due to the wiring and electrics I had to remove. The scoop is a bit ragged. I guess the previous owner never met a curb they didn't want to mount.


Dismantling Session # 4 - 8-30-13
Got a little bored on the engine and my back was hurting from bending over so I decided to hit the back end for a bit. Removed the carpets, taillights and trunk lights. Mostly original except for an after market rig up on one of the trunk lights and a wiring work around. Easy enough to put back to original. Probably going to go with new carpets any way. Solid metal throughout but for a few rust through spots on the edging where the weather striping attaches. You can see it in the last pic. Sand it and snip out the bad parts and the weather strip will go back on to hide it. Looks like this little bit of rust was a result of poor maintenance/cleaning. I will know to look out for that moving forward. All the light covers are in good shape and should shine up nicely for reinstall later.


Subscribe to:
Posts (Atom)